
Back in October, I got my first split keyboard - the ZSA Voyager, which is a 52 key wired keyboard with fancy per key LEDs and some software that makes it super easy to customise the keyboard layout and behaviours. It’s a great keyboard and certainly a great place to start your split keyboard journey.
However:
- I quickly got annoyed with all the wires on my desk
- I found I wasn’t using any of the keys on the top row or the outer columns because they were quite uncomfortable to reach
- I thought I wanted a three key thumb cluster
So I quickly started designing my own keyboard in Ergogen and Tinkercad, with the help of FlatFootFox’s awesome long form blogpost and after watching Joe Scotto’s How to Build a Handwired Keyboard many many times. I finished the Lobo late December and I was pretty chuffed with it… not perfect but something of my own and, moreover, something I could iterate on and improve based on what I learned.
Designing the Lobo
I learned a lot from building the Lobo. Hand wiring it helped me get my head around the basic building blocks of a keyboard and what connects to what (in a very tactile way). But also, I learned a lot about what’s important for me in a keyboard.

Before building the Lobo, I’d read a bunch of stuff about how our hands aren’t row staggered and that column staggering makes more sense… Also that our fingers aren’t the same length and they don’t extend parallel to one another but instead splay out when fully stretched.
So I started by putting my hands on a sheet of paper then extending and contracting all the fingers and marking down where my fingers landes to build a bit of a heat map of where my fingers landed naturally (when no keyboard was involved). I figured if I designed my keyboard around my hands rather than trying to bend my hands around my keyboard, I might end up with a better outcome. I took some quick measurements of distances and angles and threw it in Ergogen… then printed out the resulting layouts tested ‘imaginary’ typing on those. After a few iterations I had what I thought I’d be comfortable with but typing on paper isn’t really like typing on a keyboard.
To make it more realistic, I tried cutting 14mm x 14mm holes out of a stiff cardboard wine box that I had, to hold some some real keyboard switches. That created a much more realistic prototype but was extremely laborious and hard to iterate on. At that point I persuaded myself I needed a 3d printer… after which things went much more quickly. Once I had a printer, I could easily export keyboard layouts from ergogen that I could import into Tinkercad and print as 1.2mm or 1.4mm plates to hold the switches. That way I could quickly try different designs without having to build a full keyboard and without having to spend ages with an exacto knife and salvaged cardboard.
I eventually landed on a design with fairly extreme splaying (particularly for the pinky) and quite a lot of stagger:

Lessons learned from the Lobo
All of that was fine in theory but, after typing on the keyboard for a few weeks, I realised it was actually less comfortable than the Voyager. Initially I was in denial of this… surely my baby that I spent so long planning and building could not be imperfect! But after a while I started to work out what the problems were.
Certain key combinations in particular were very uncomfortable. For example, pressing W followed by A. It took me a while to work out why. Essentially, by adding column staggering and splaying to the pinky, I significantly increased the distance between the W and the A keys…
For my paper prototype, I’d been moving each finger individually to see where it landed comfortably on the page. And so the physical layout I had was very comfortable as long as I was only typing words that consisted entirely of letters typed by a single finger… It was only when I started using my keyboard as my daily driver, to type for realz, that this became apparent.
Also, even though I thought I wanted three keys on the thumb cluster, it turns out that not only did I not use the third one for anything important but I often pressed it by mistake… having three keys there made it much harder to press the one I actually intended to press. So for my next keyboard, I figured I’d go back to two keys on the thumb clusters.
I also discovered quite quickly (when ordering all the parts to build the lobo) that the switches are the most expensive bit… so for my next design, hot swappable (i.e. removable) switches was a must.
Finally, I wanted a keyboard with an integrated trackpad.
The Paw
Taking the lessons from the lobo I set about designing a new keyboard.
I had the idea of making the trackpad removable, so that it would be easier to transport… and I figured the modeling for that might be a bit beyond Tinkercad, so for the Paw I decided to use Shapr3d.
Also since I was going to do a hot swappable keyboard, I figured I needed a PCB. I know that’s not strictly true. Initially I started trying to model a case for a handwired keyboard but it seemed to be swimming against the current so eventually I took the plunge and designed some PCBs. Initially I was trying to use Ergogen to create these but it’s a total PITA to have to redo all the tracks in KiCad every time you want to change something in the Ergogen design… so in the end I created both the schema and the PCB design entirely in KiCad and stopped using Ergogen for any part of the keyboard’s design.
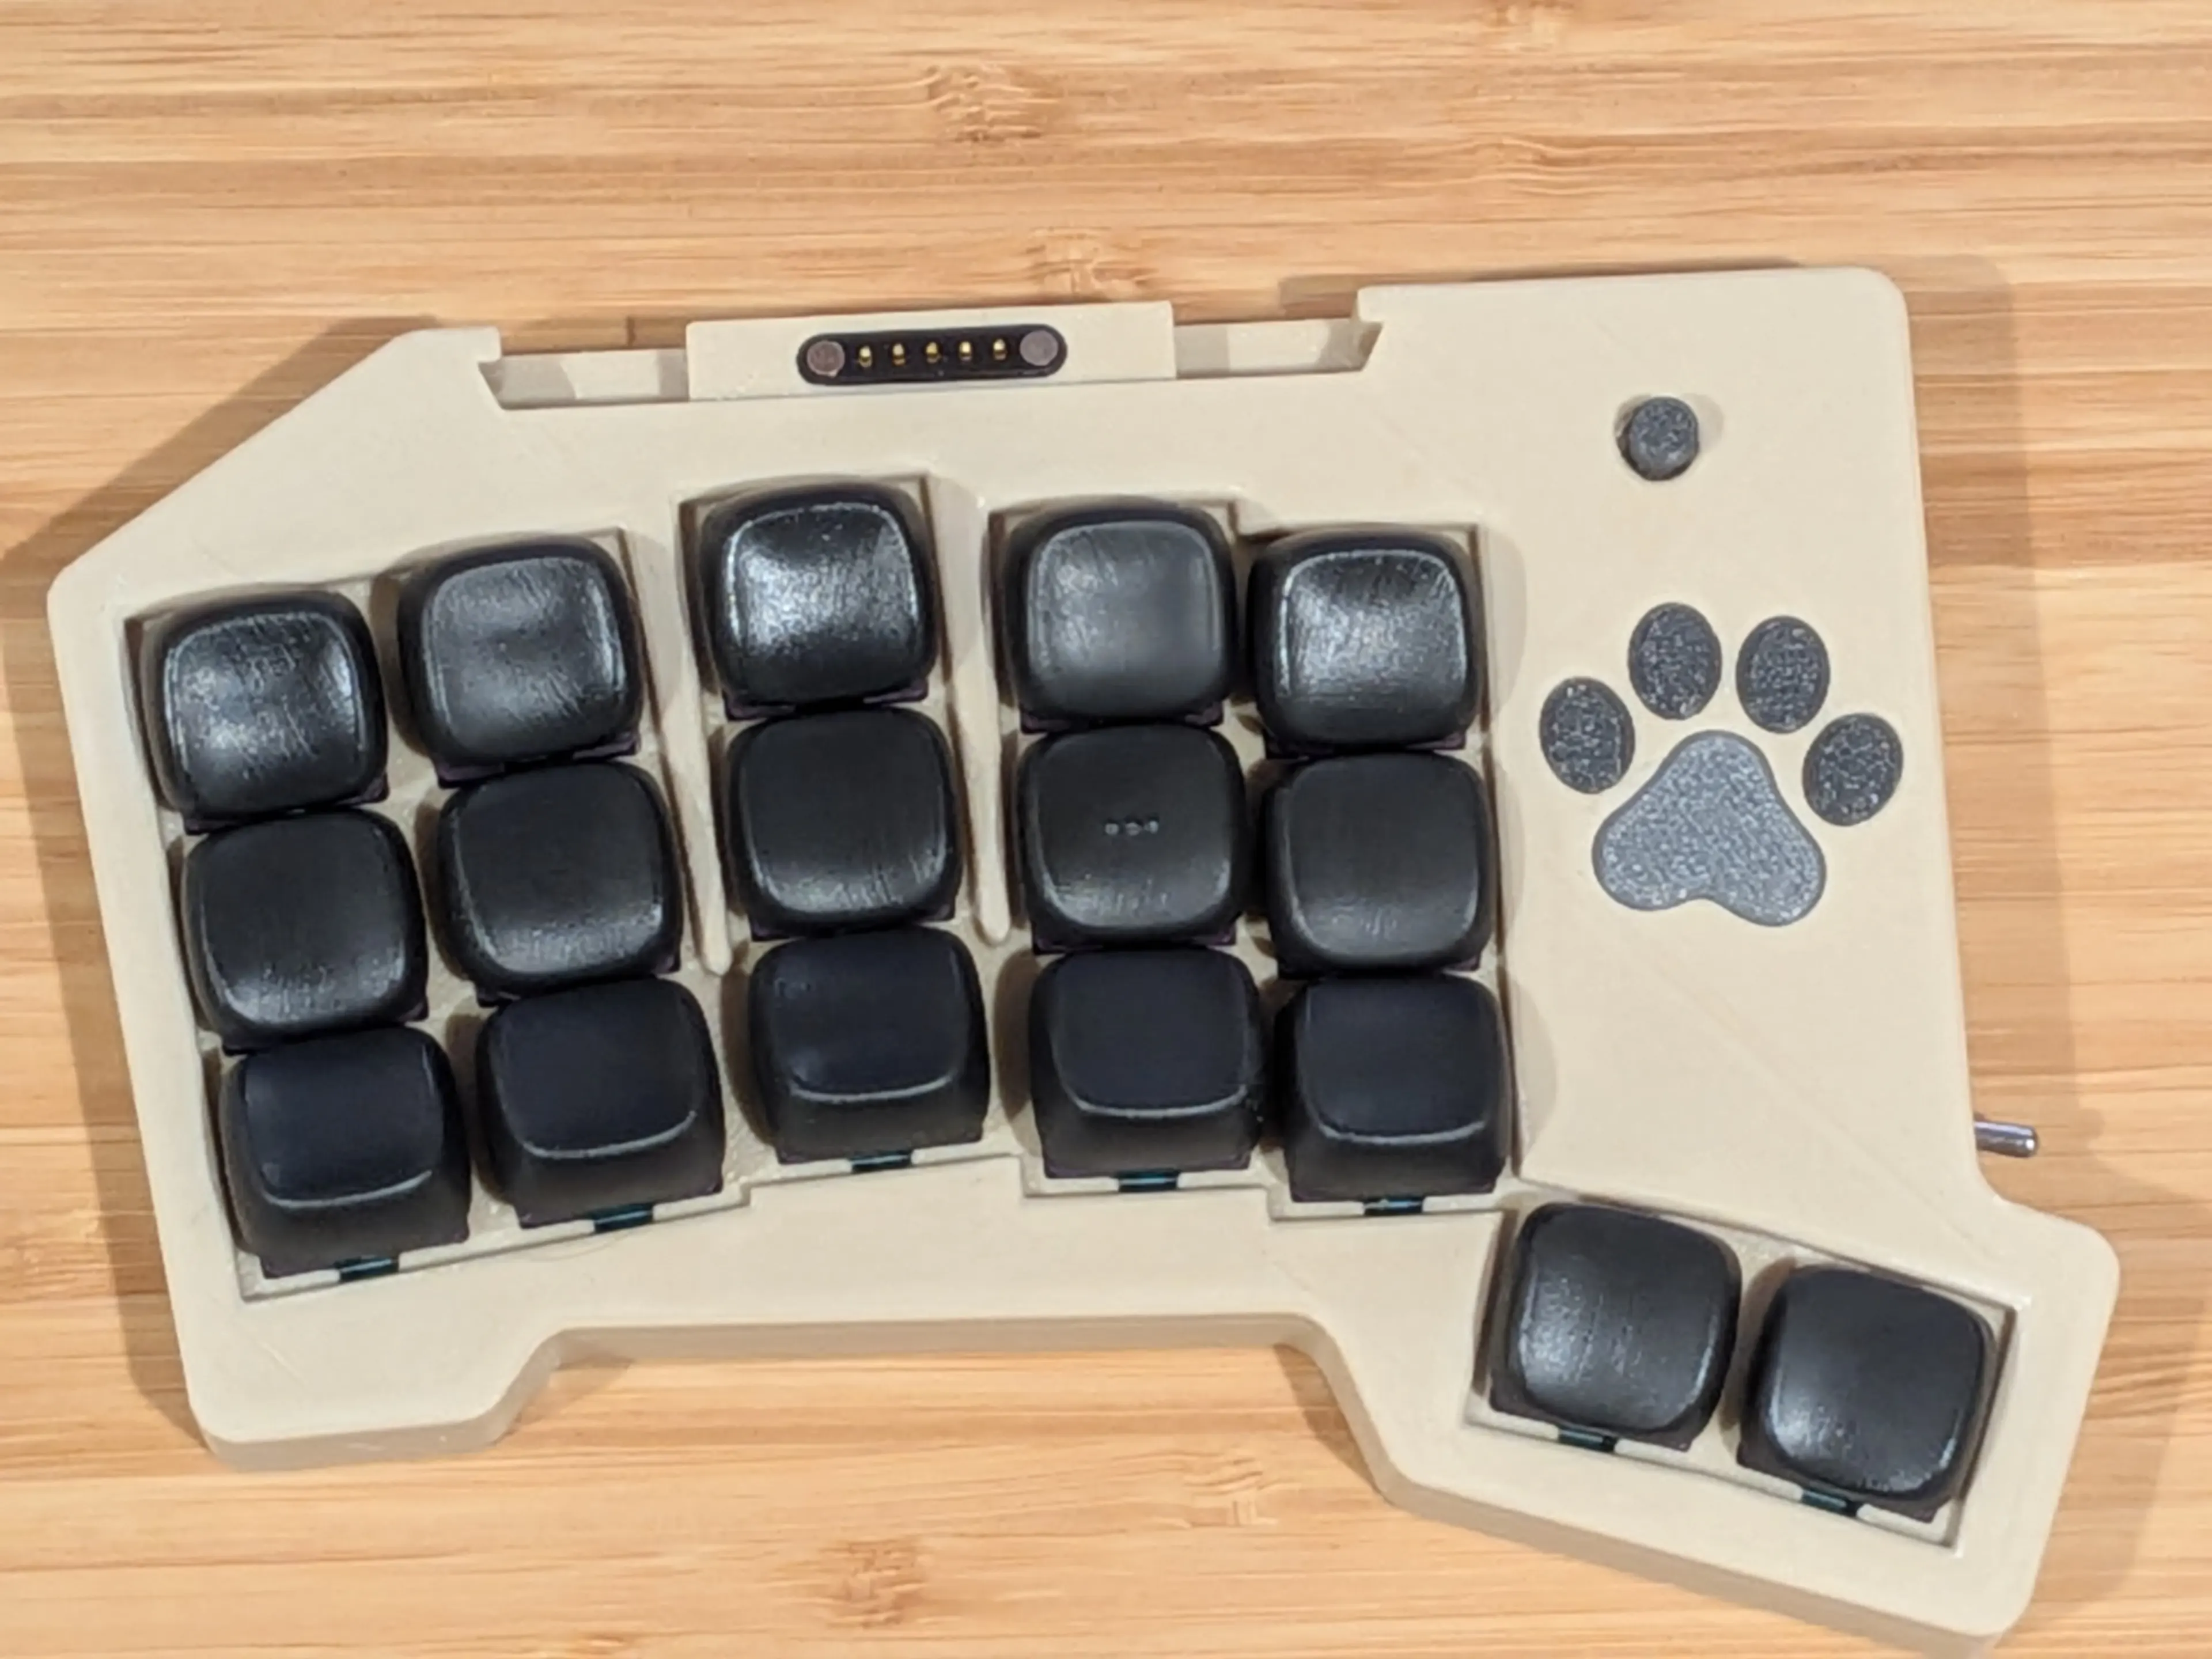
In any case, enough yabbering about design decisions… What I ended up with as an end result is the following:
A 34 key wireless split keyboard
At it’s core, it’s essentially just another 34 key wireless split keyboard:
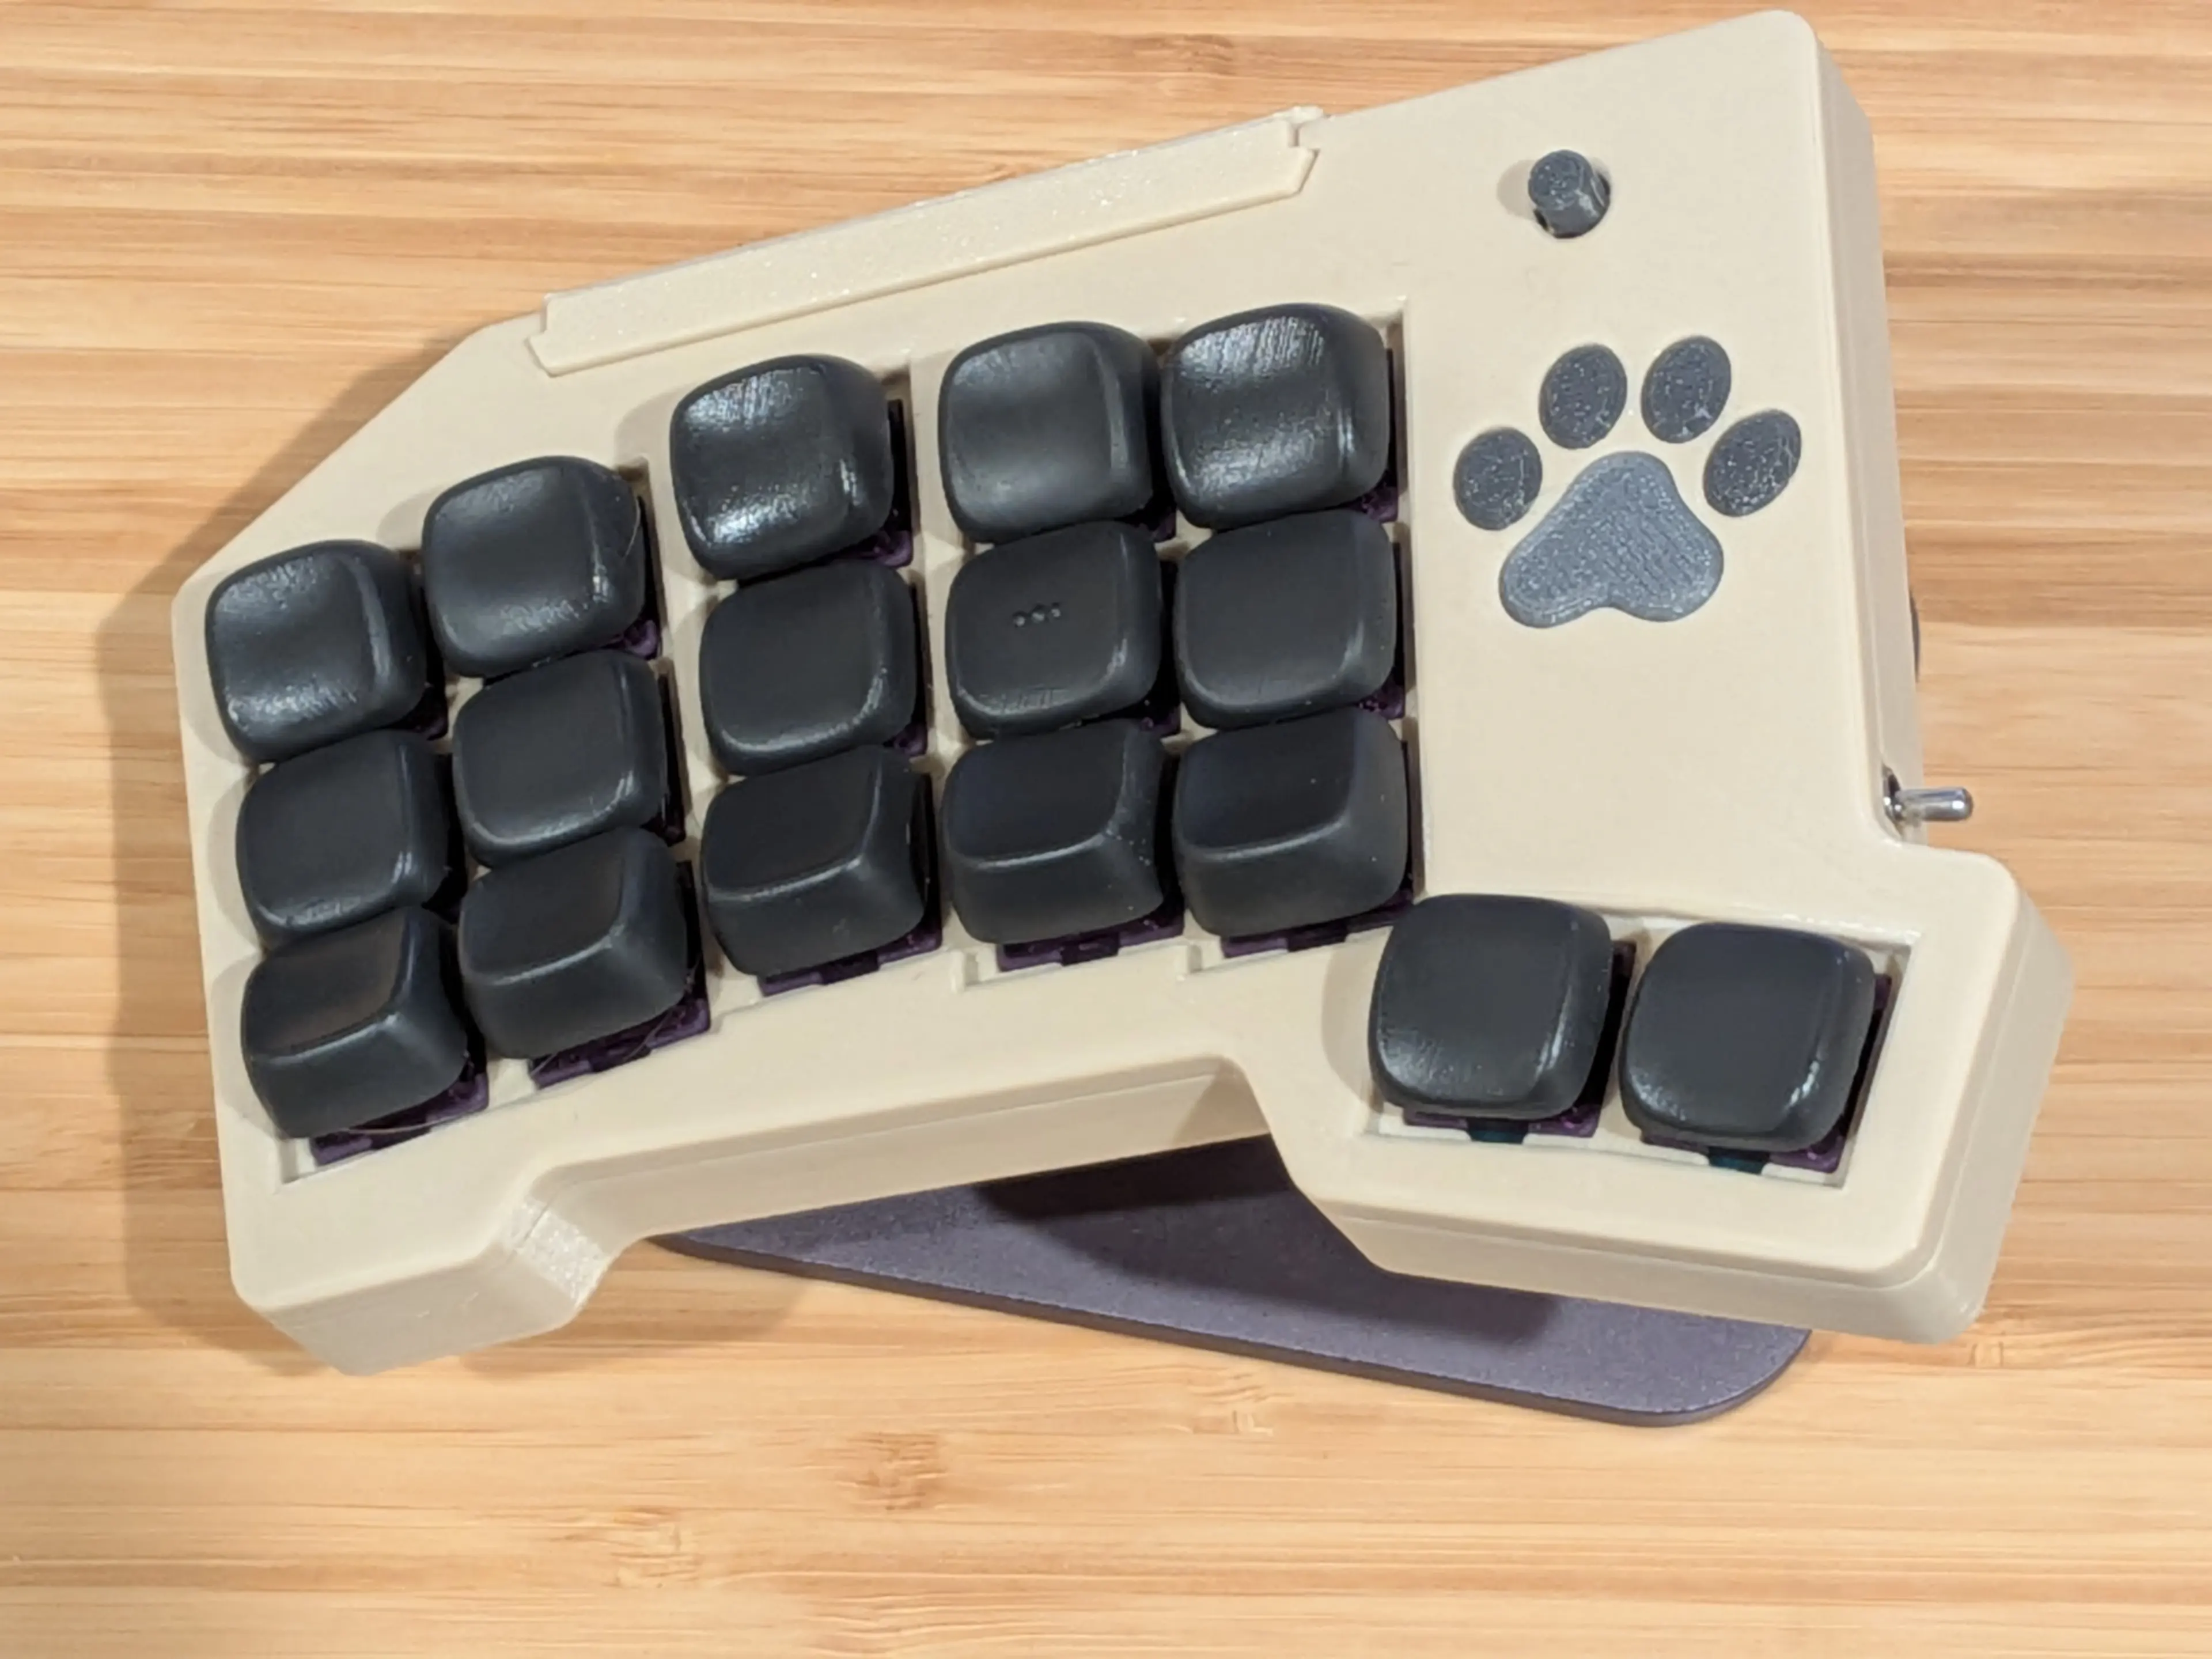
Magnetic serial port
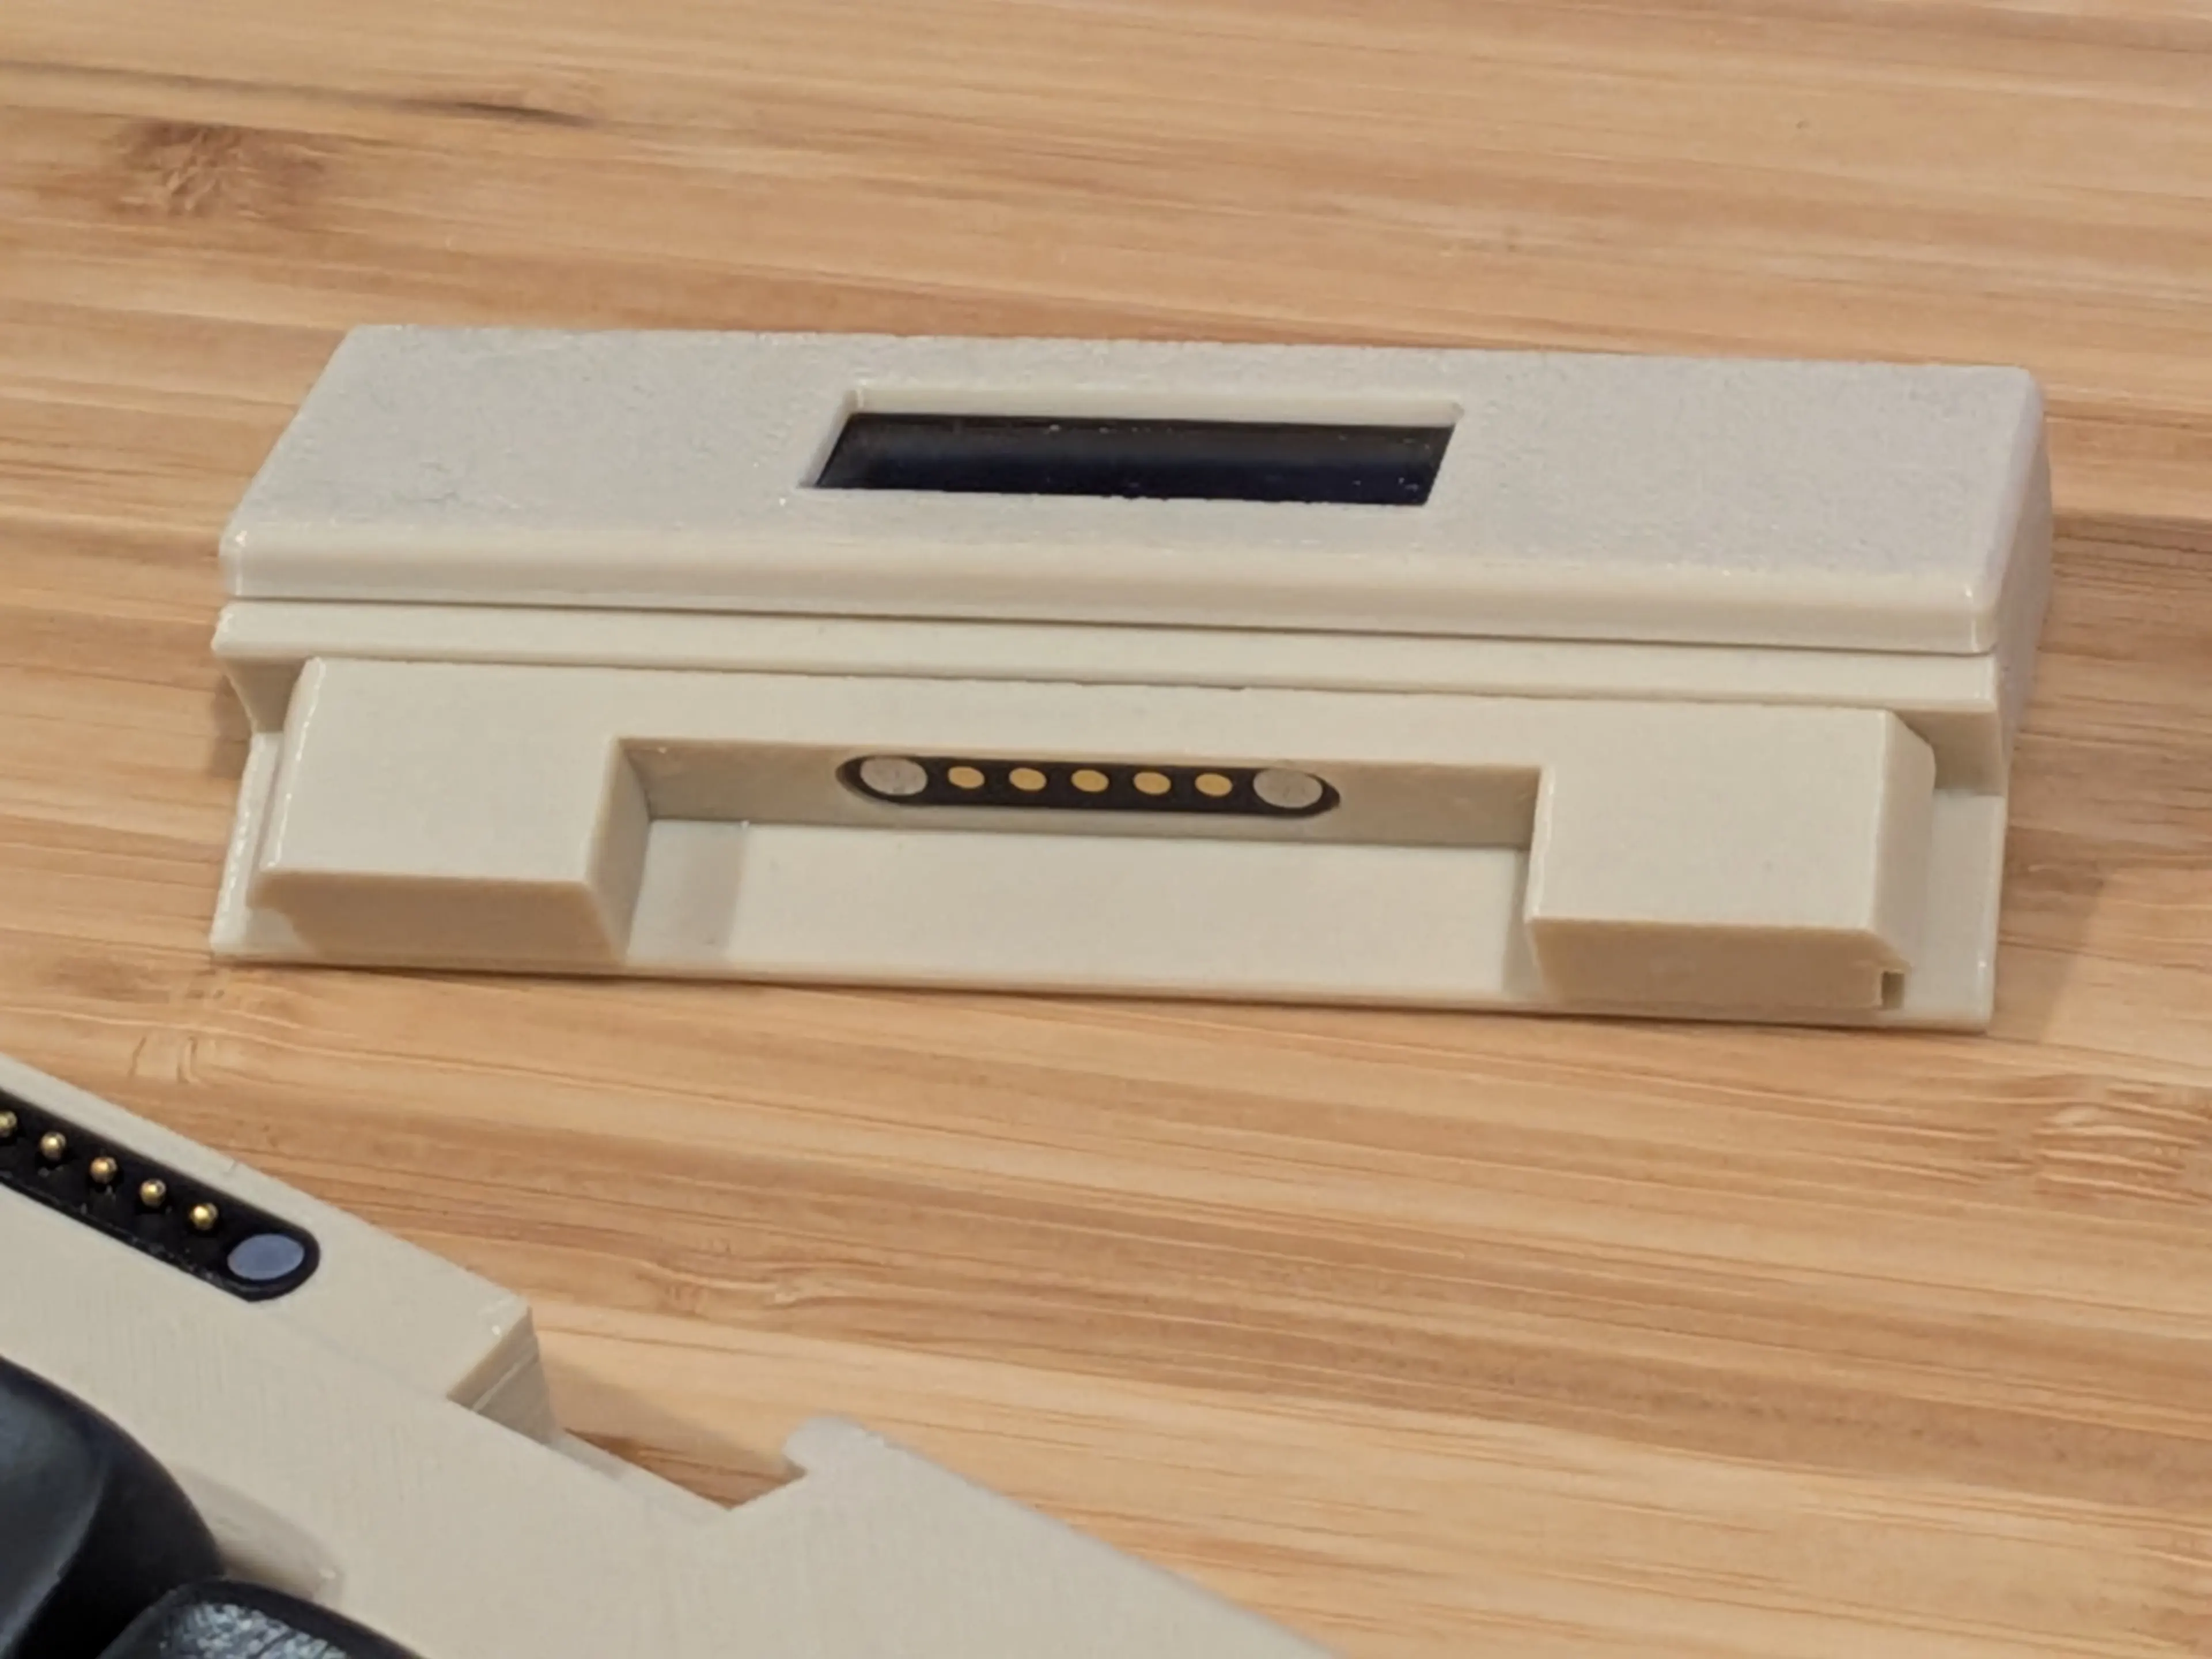
However, at the top of the keyboard, you can see a small plastic stopper, which is covering a 5 pin magnetic pogo connector. You don’t have to use this if you don’t want. If you’re using it with a dongle, for example, an OLED on the keyboard might be unnecessary and so rather than having anything connected to this pogo connector, you could just have the stopper in there.
If you remove the stopper, you can see the connector though:
The connector has 5 pins… the last four of which should theoretically welcome any I2C device, with an OLED being the most obvious thing you can plug in there.
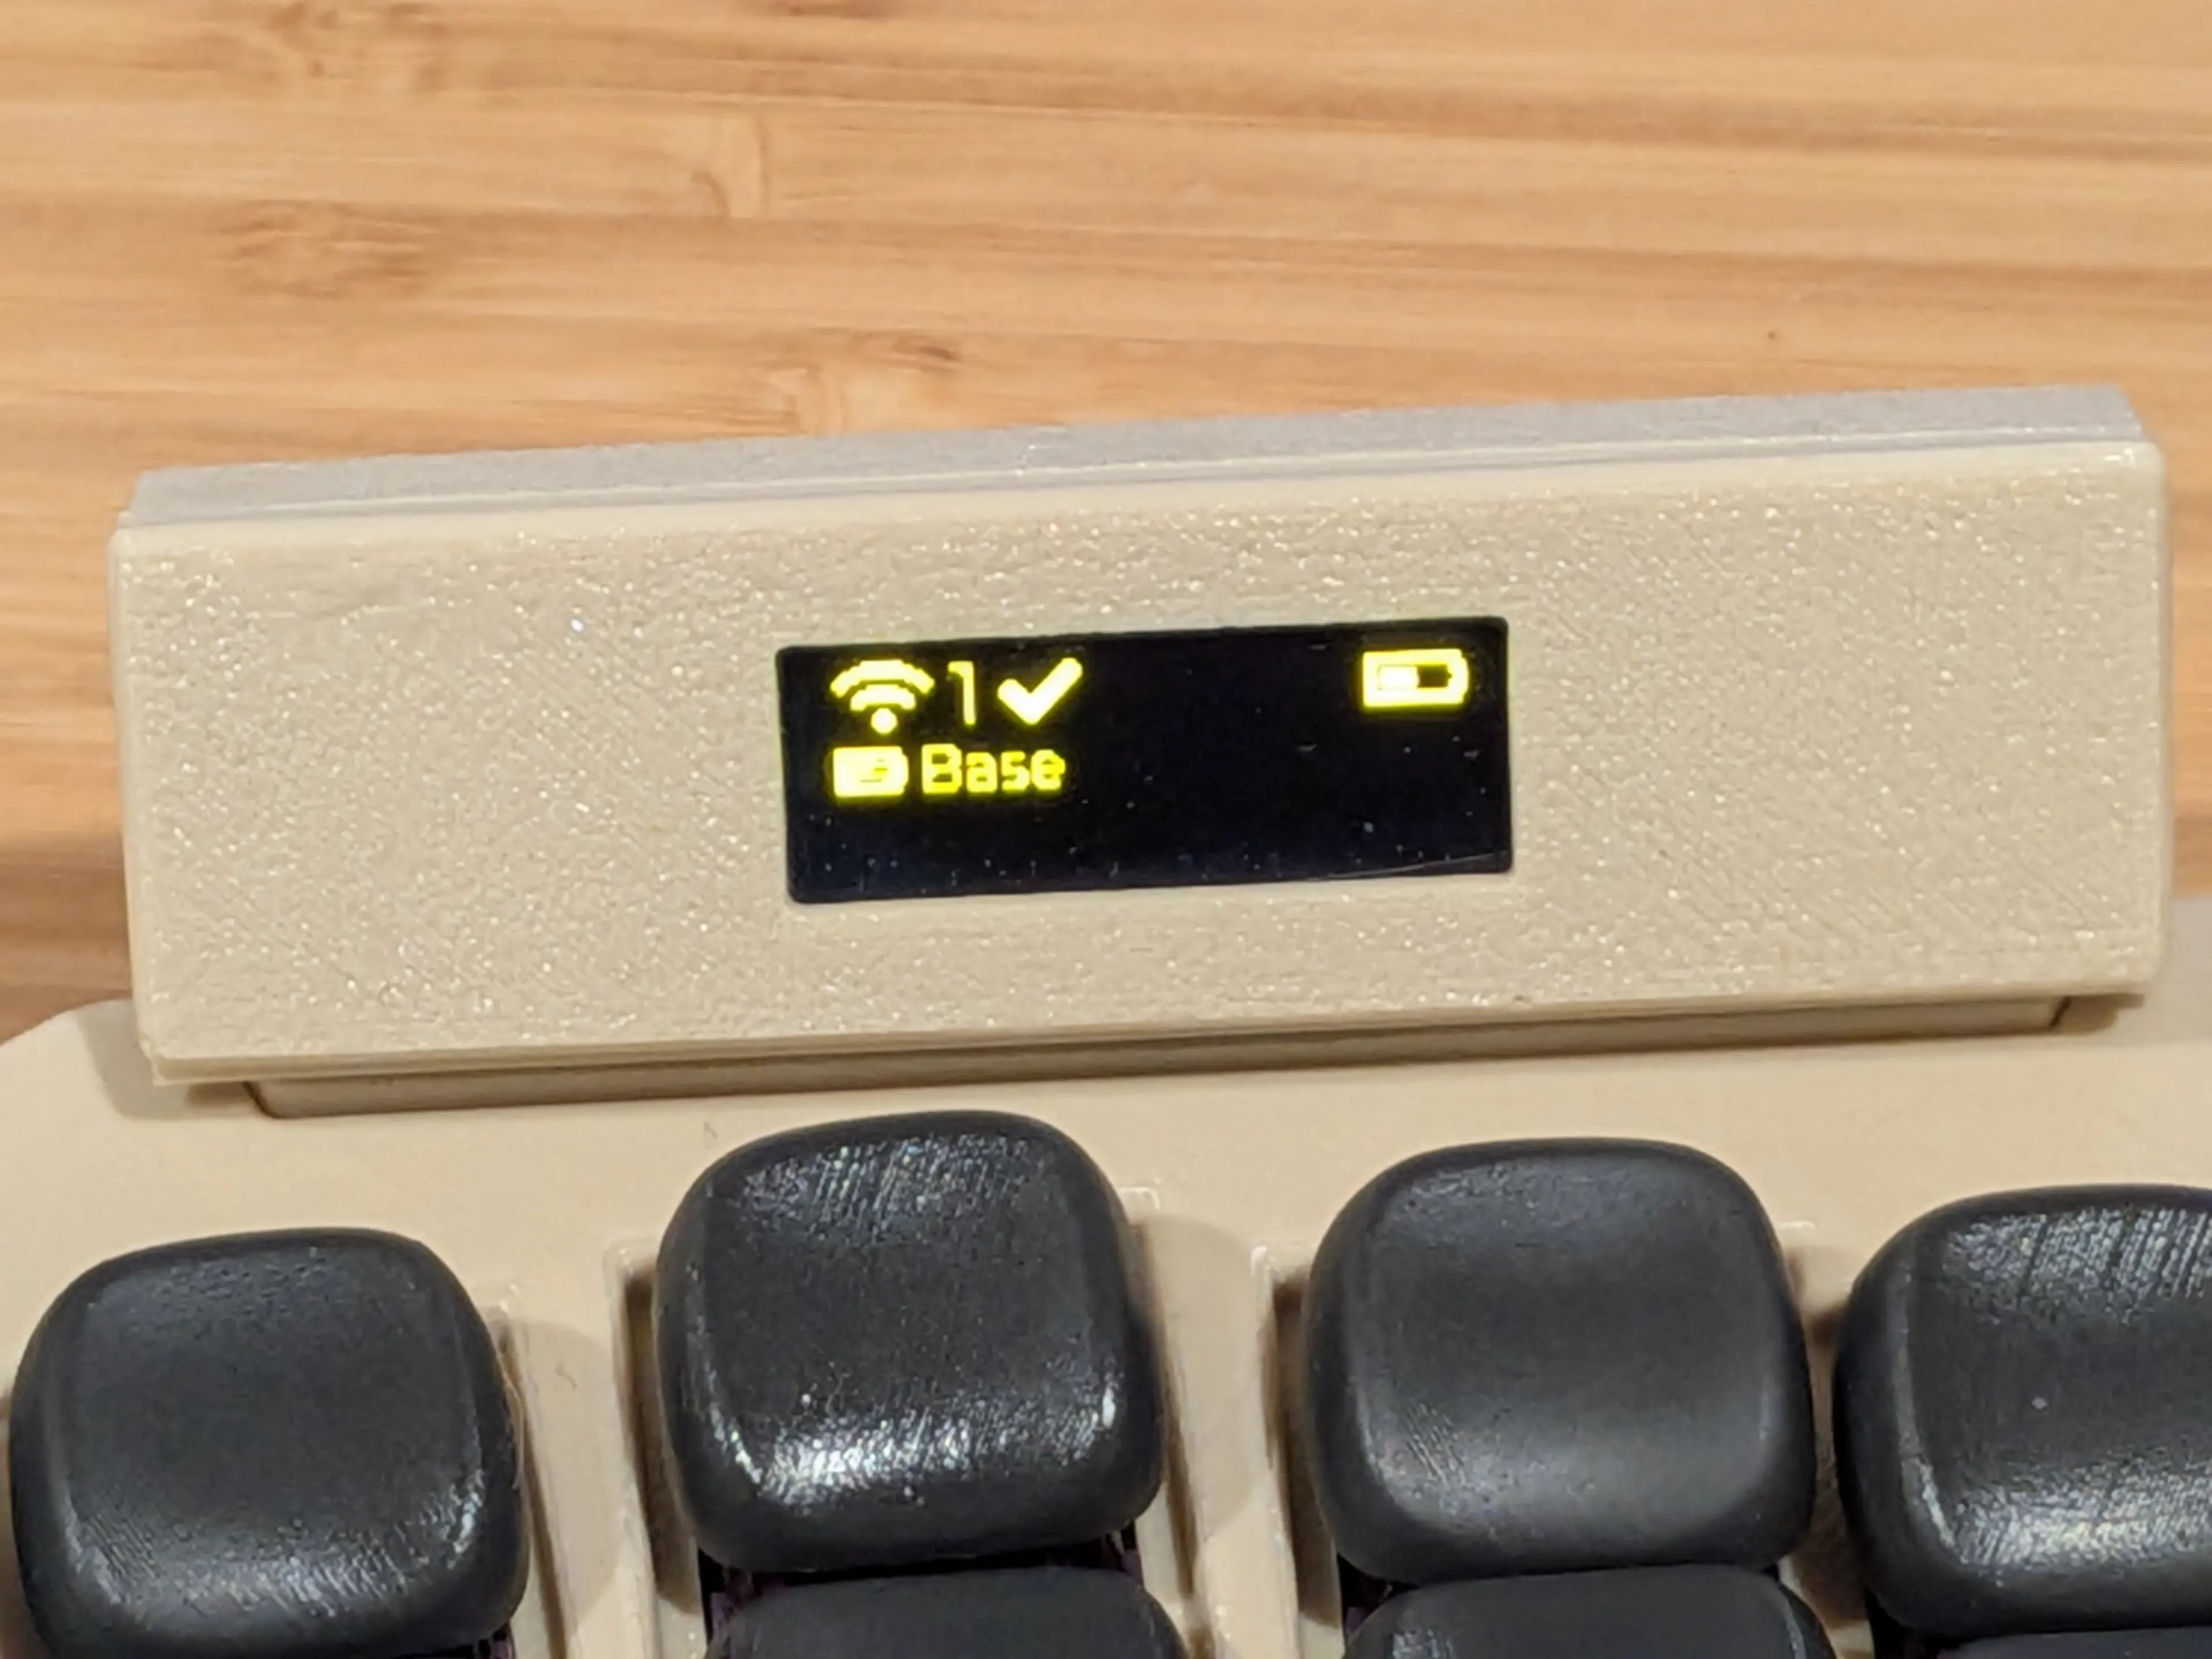
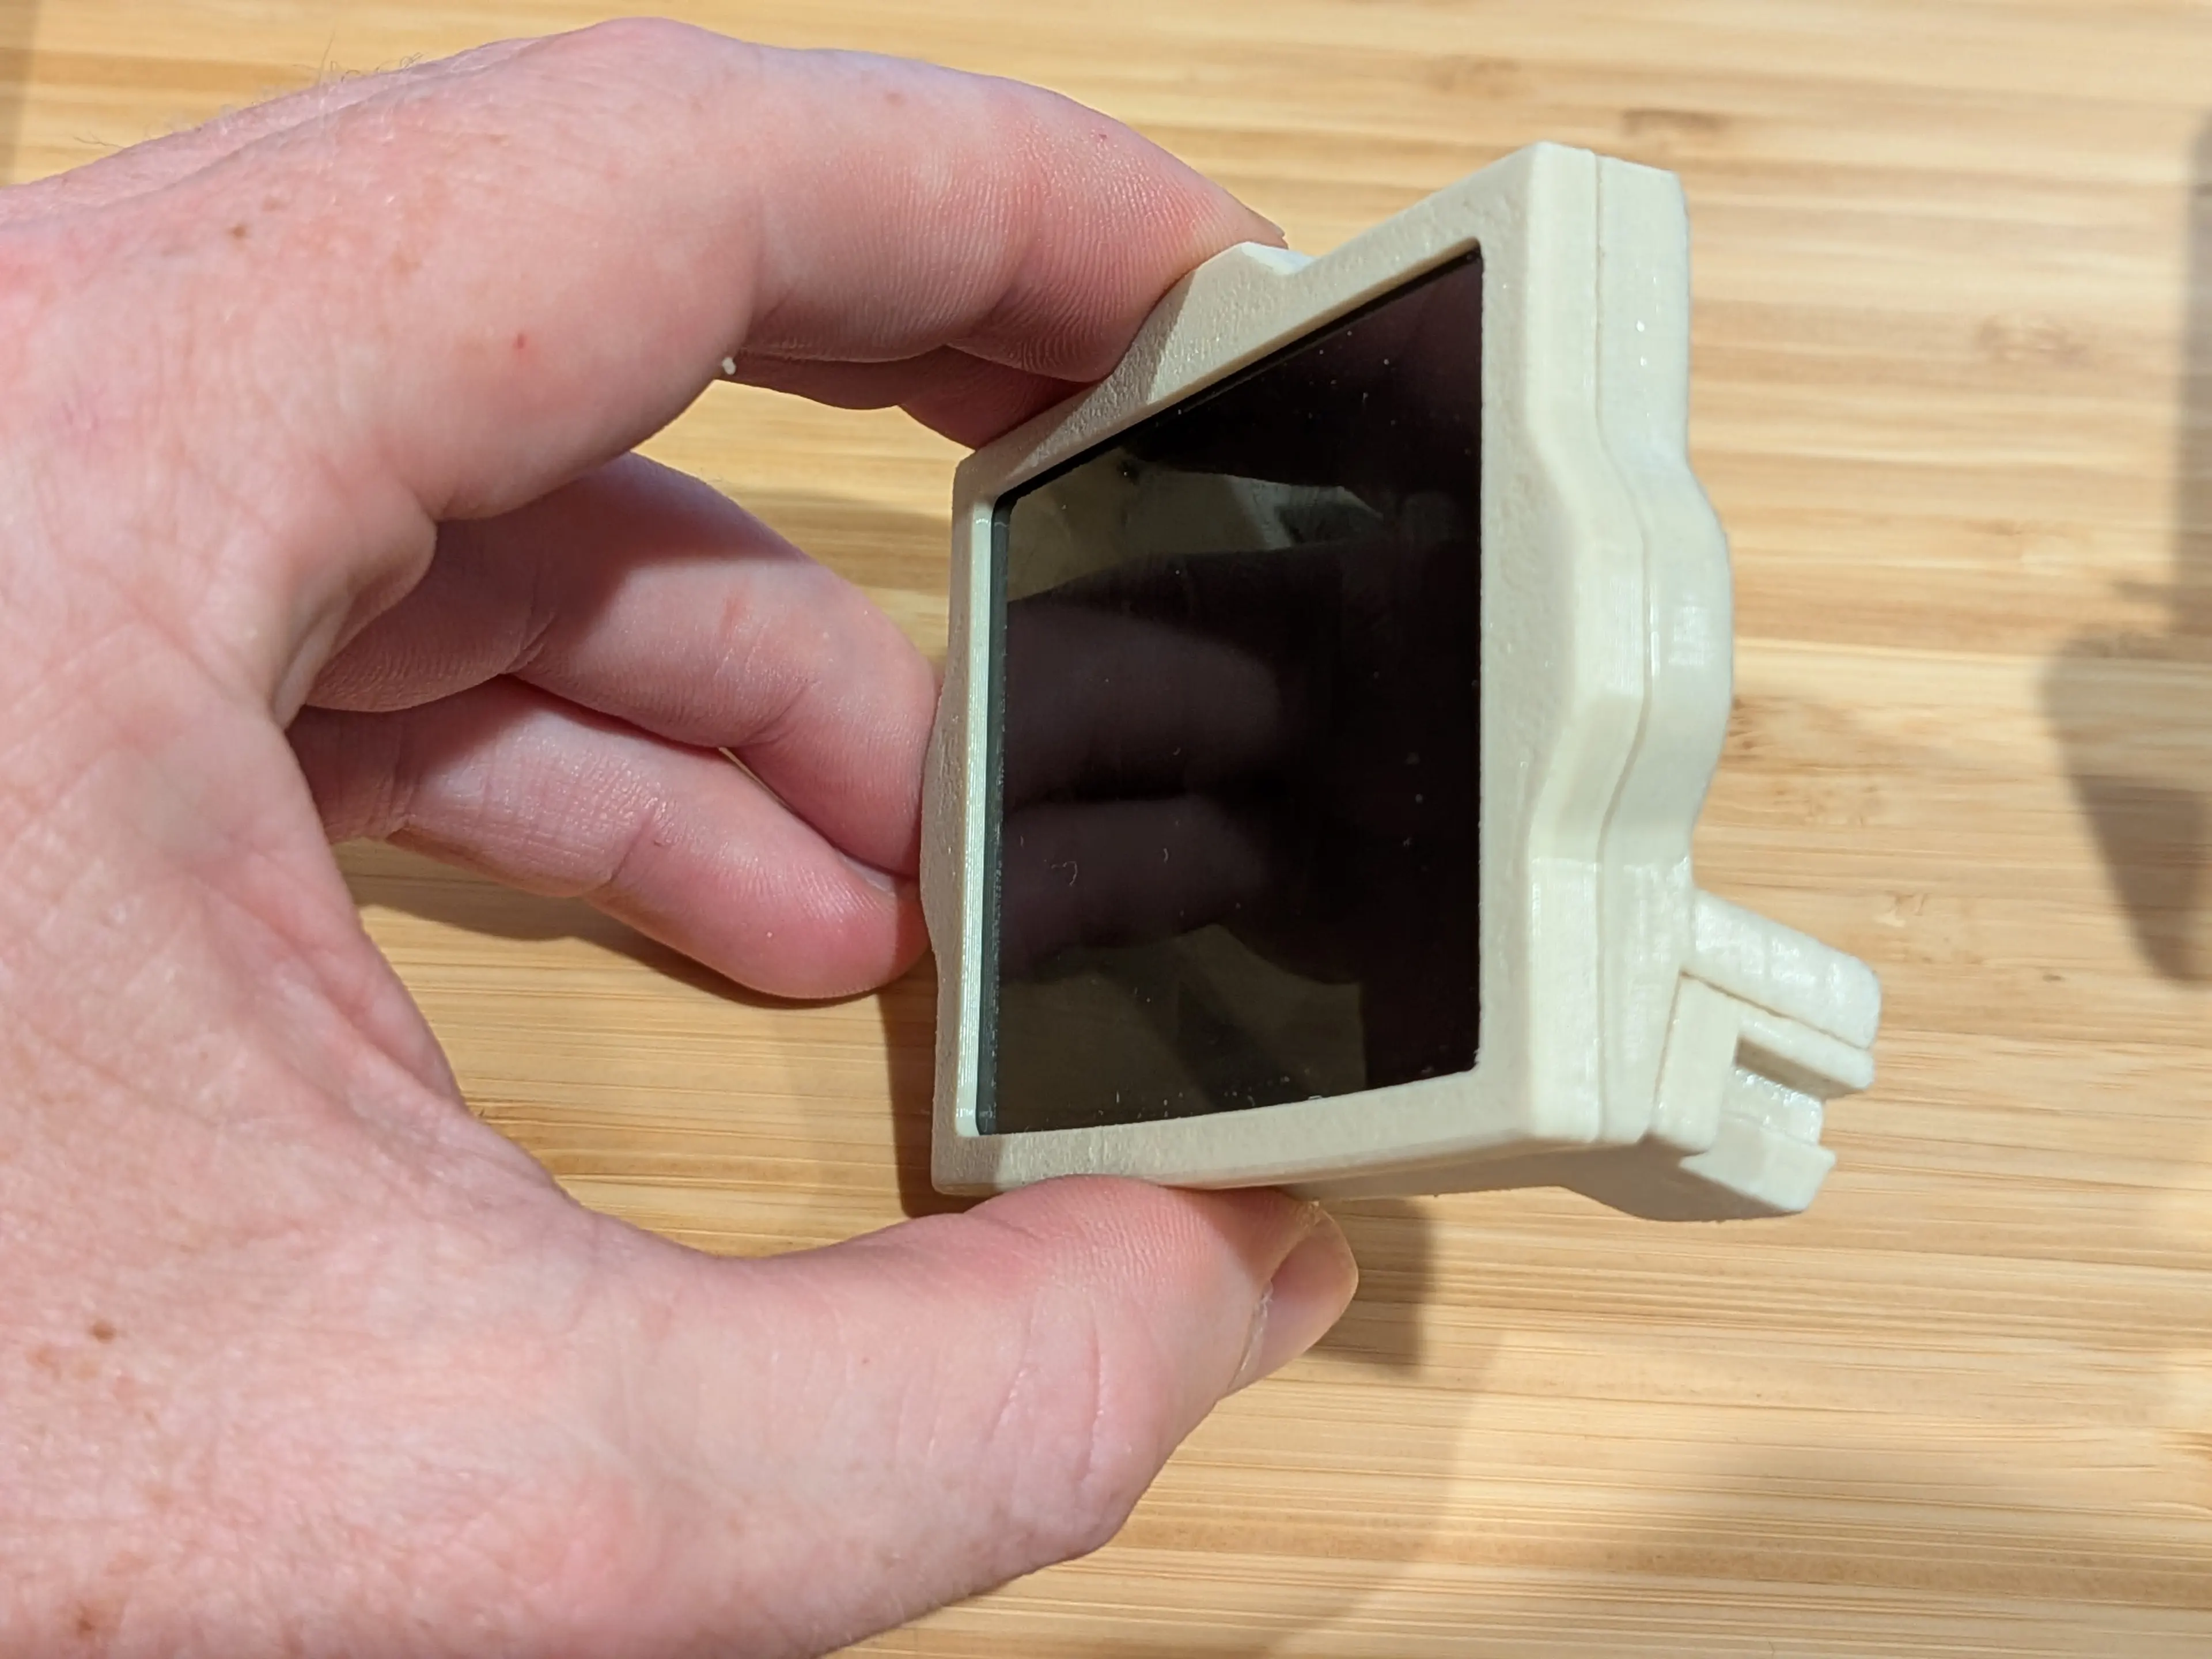
Removable OLED
The OLED I’ve designed (so far) is using a 0.91” display and has a 60 degree tilt on it, which seems OK but maybe I’d try something with a 30 degree tilt in the future. I’d like to try a smaller display as well, but haven’t managed to get ZMK working with one of those yet.
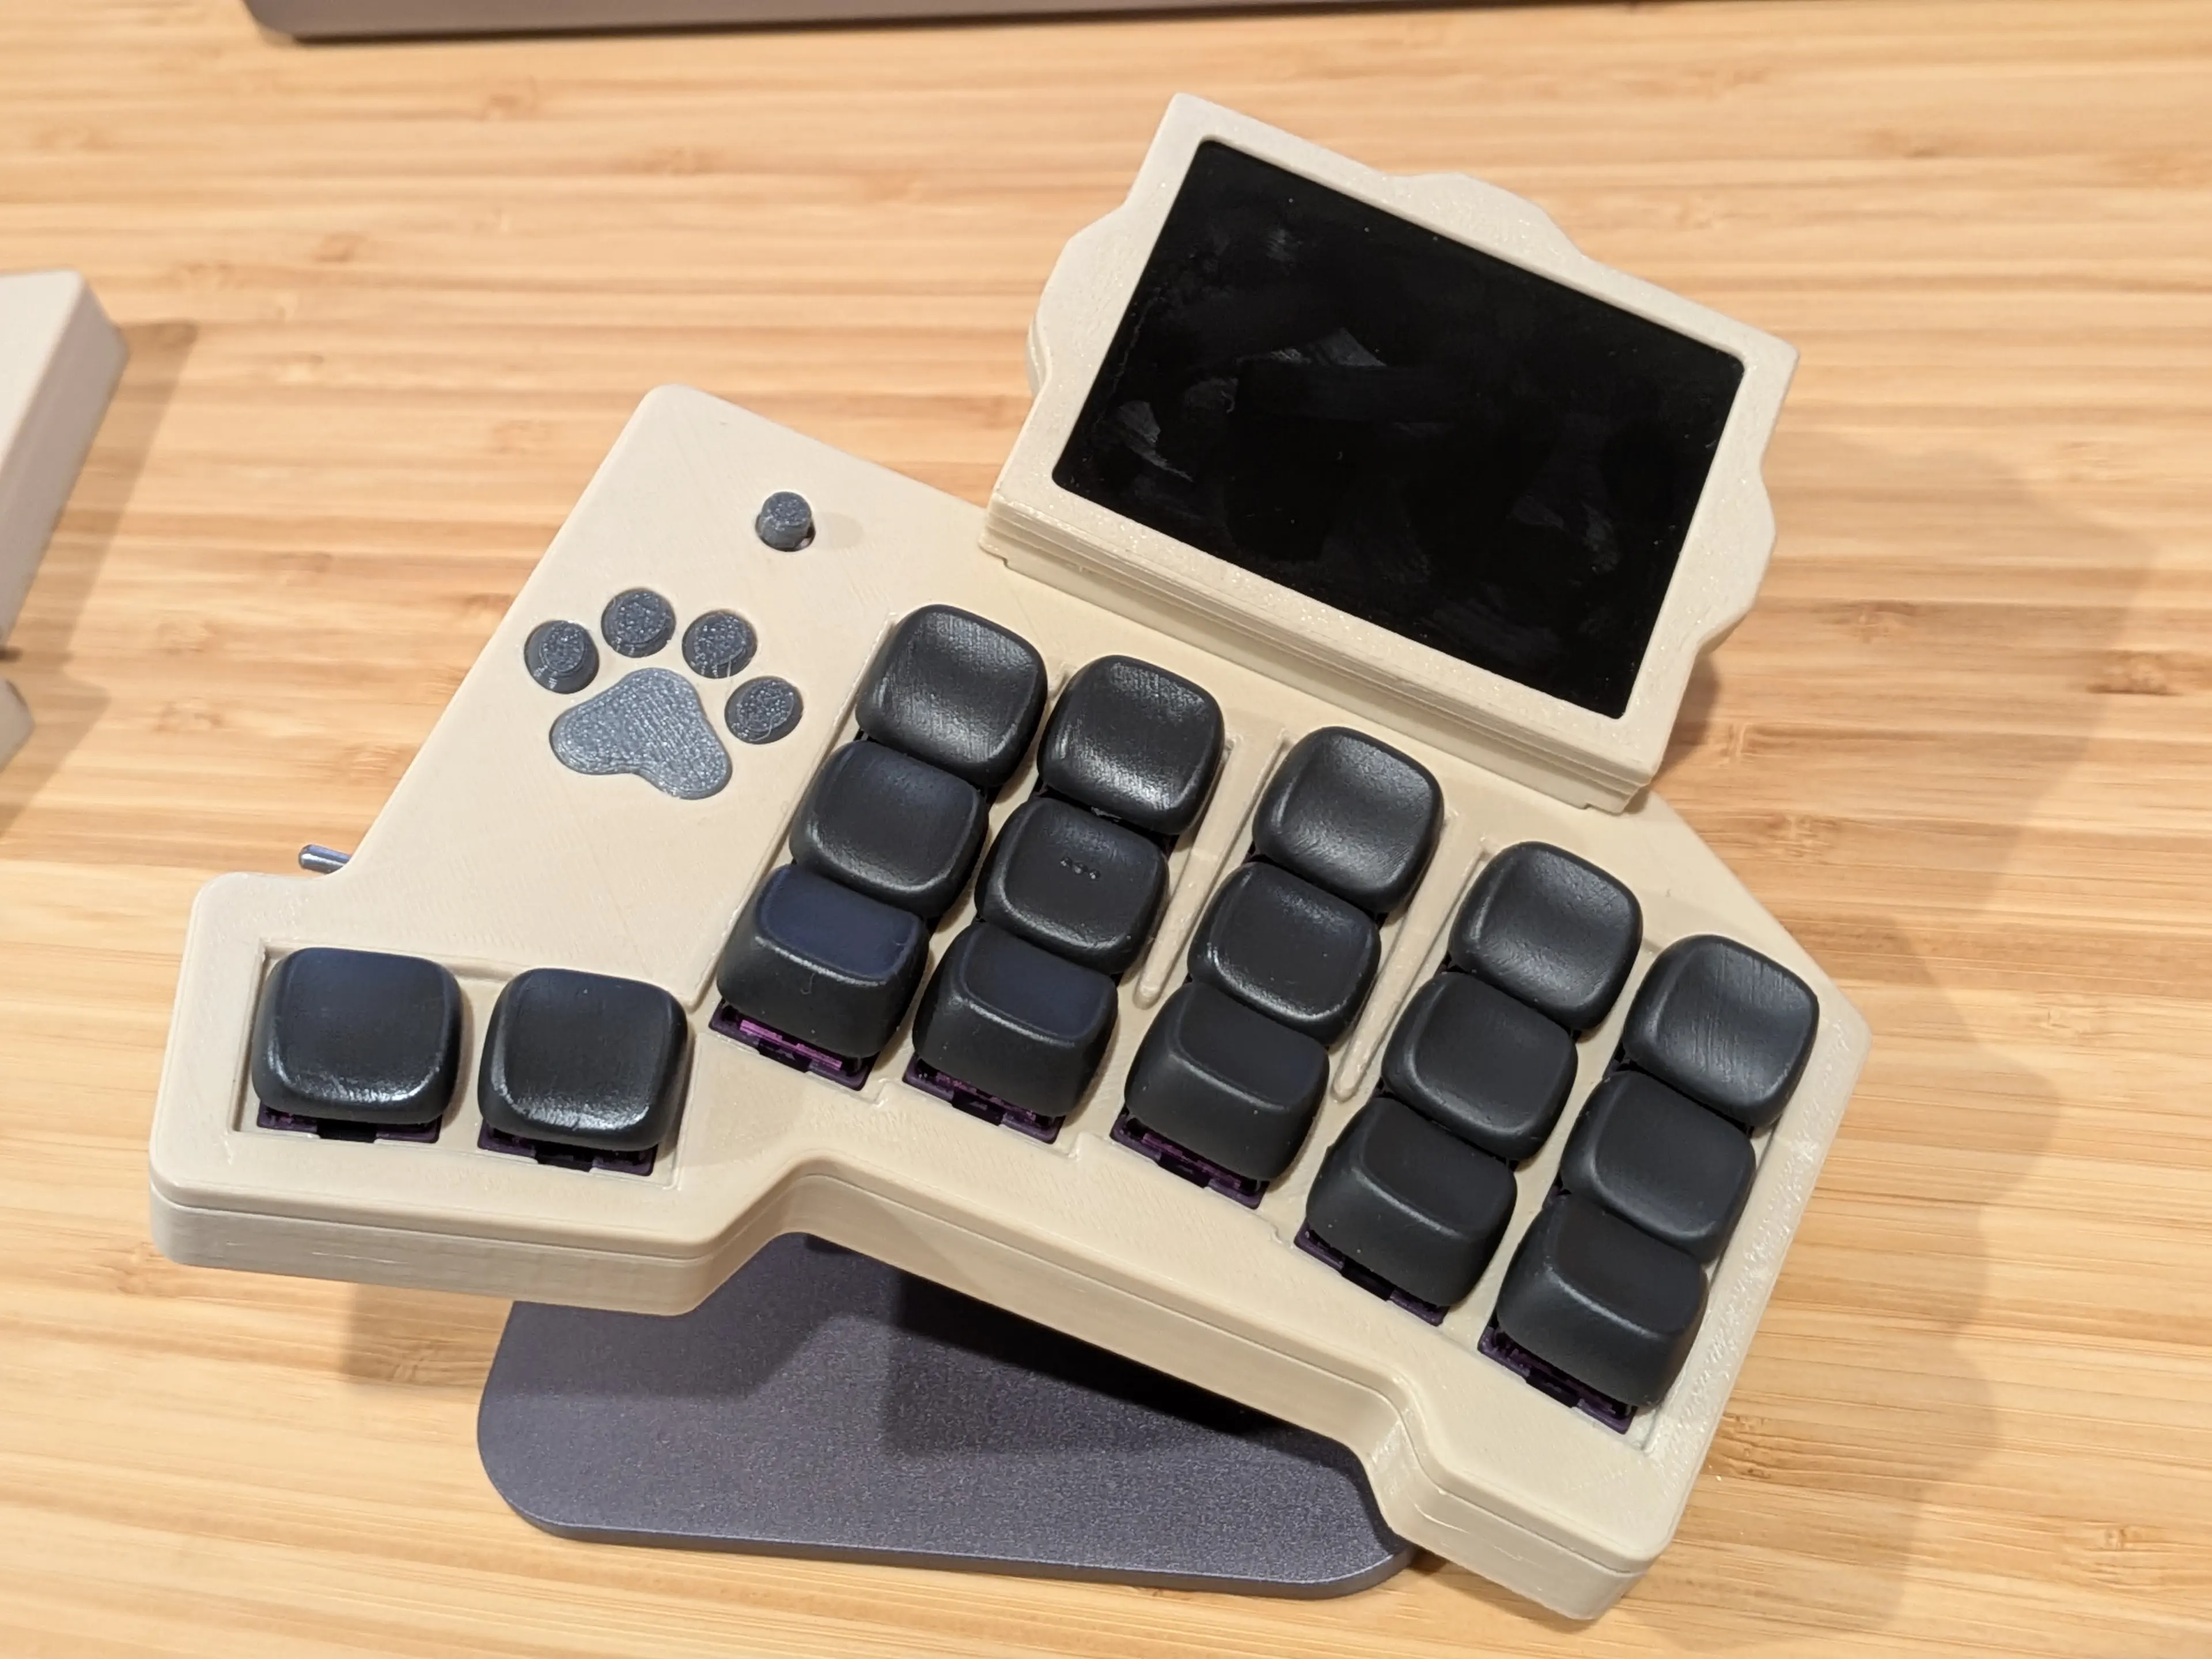
When connected, it looks like this:
65mm x 49mm Trackpad
Probably more useful than an OLED though is the Azoteq 65mm x 49mm trackpad module.
Again, this has a bit of angle to it, so that it feels like an extension of the keywell when you stretch your fingers out. This one has an angle of 15 degrees. I’ve got a model for one with a 30 degree angle… I was initially worried that might be too much and might cause some discomfort due to ulnar deviation, which is why I dialled it back to 15 degrees. Having used the 15 degree model for a few days now though, I’m thinking maybe the 30 degree version might not be so bad.
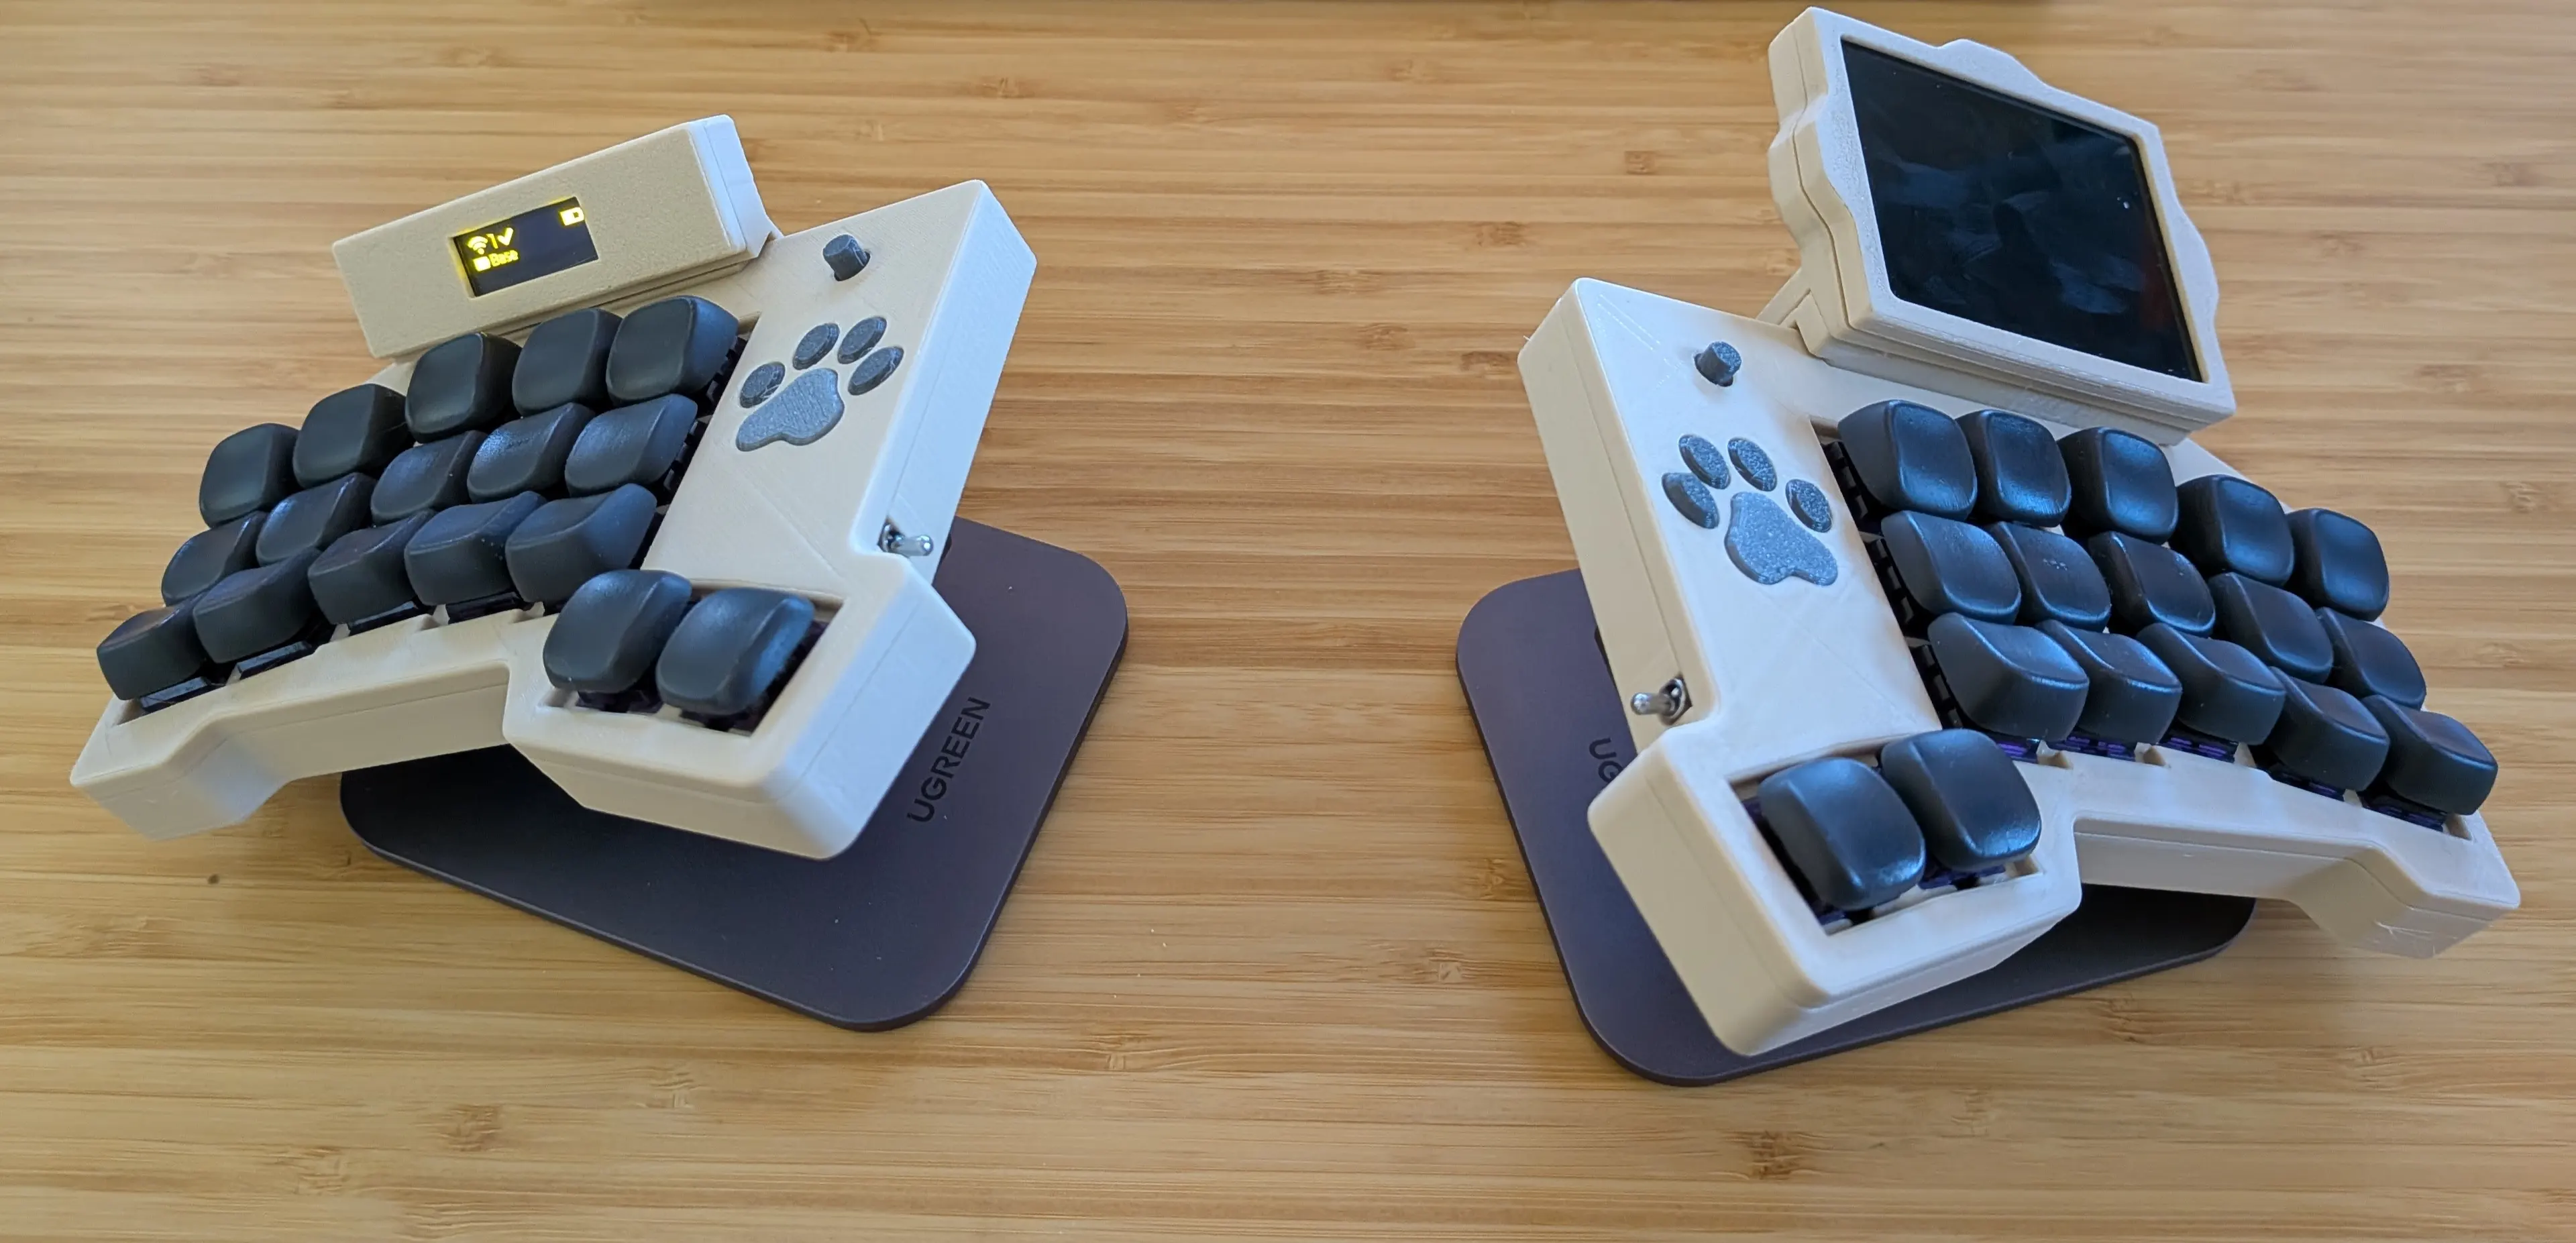
In any case, this is what it looks like when sitting in the magnetic serial port:
btw: big thank you to faithfulfly for helping me get this going on the peripheral side of the board… initially I could only get this working on the central part.
End result
With everything fully loaded then, it looks like this:
Miscellaneous details
It has hot swap support for either Choc V1 or Choc V2 switches. Personally on my board I’m rocking the Kailh Purple Iris Silent super low profile with 30g actuation force… I like light and silent.
I reduced the vertical spacing of the switches to the absolute minimum that I could without the keycaps coliding with one another (17mm). The inner and outer rows run parallel to one another now (having gotten rid of the splay that I had in the design for the Lobo) and the spacing on these is also the minimum (18mm). The result is that I now only have to make very small movements with my fingers when typing… compared to my previous board it feels magical!
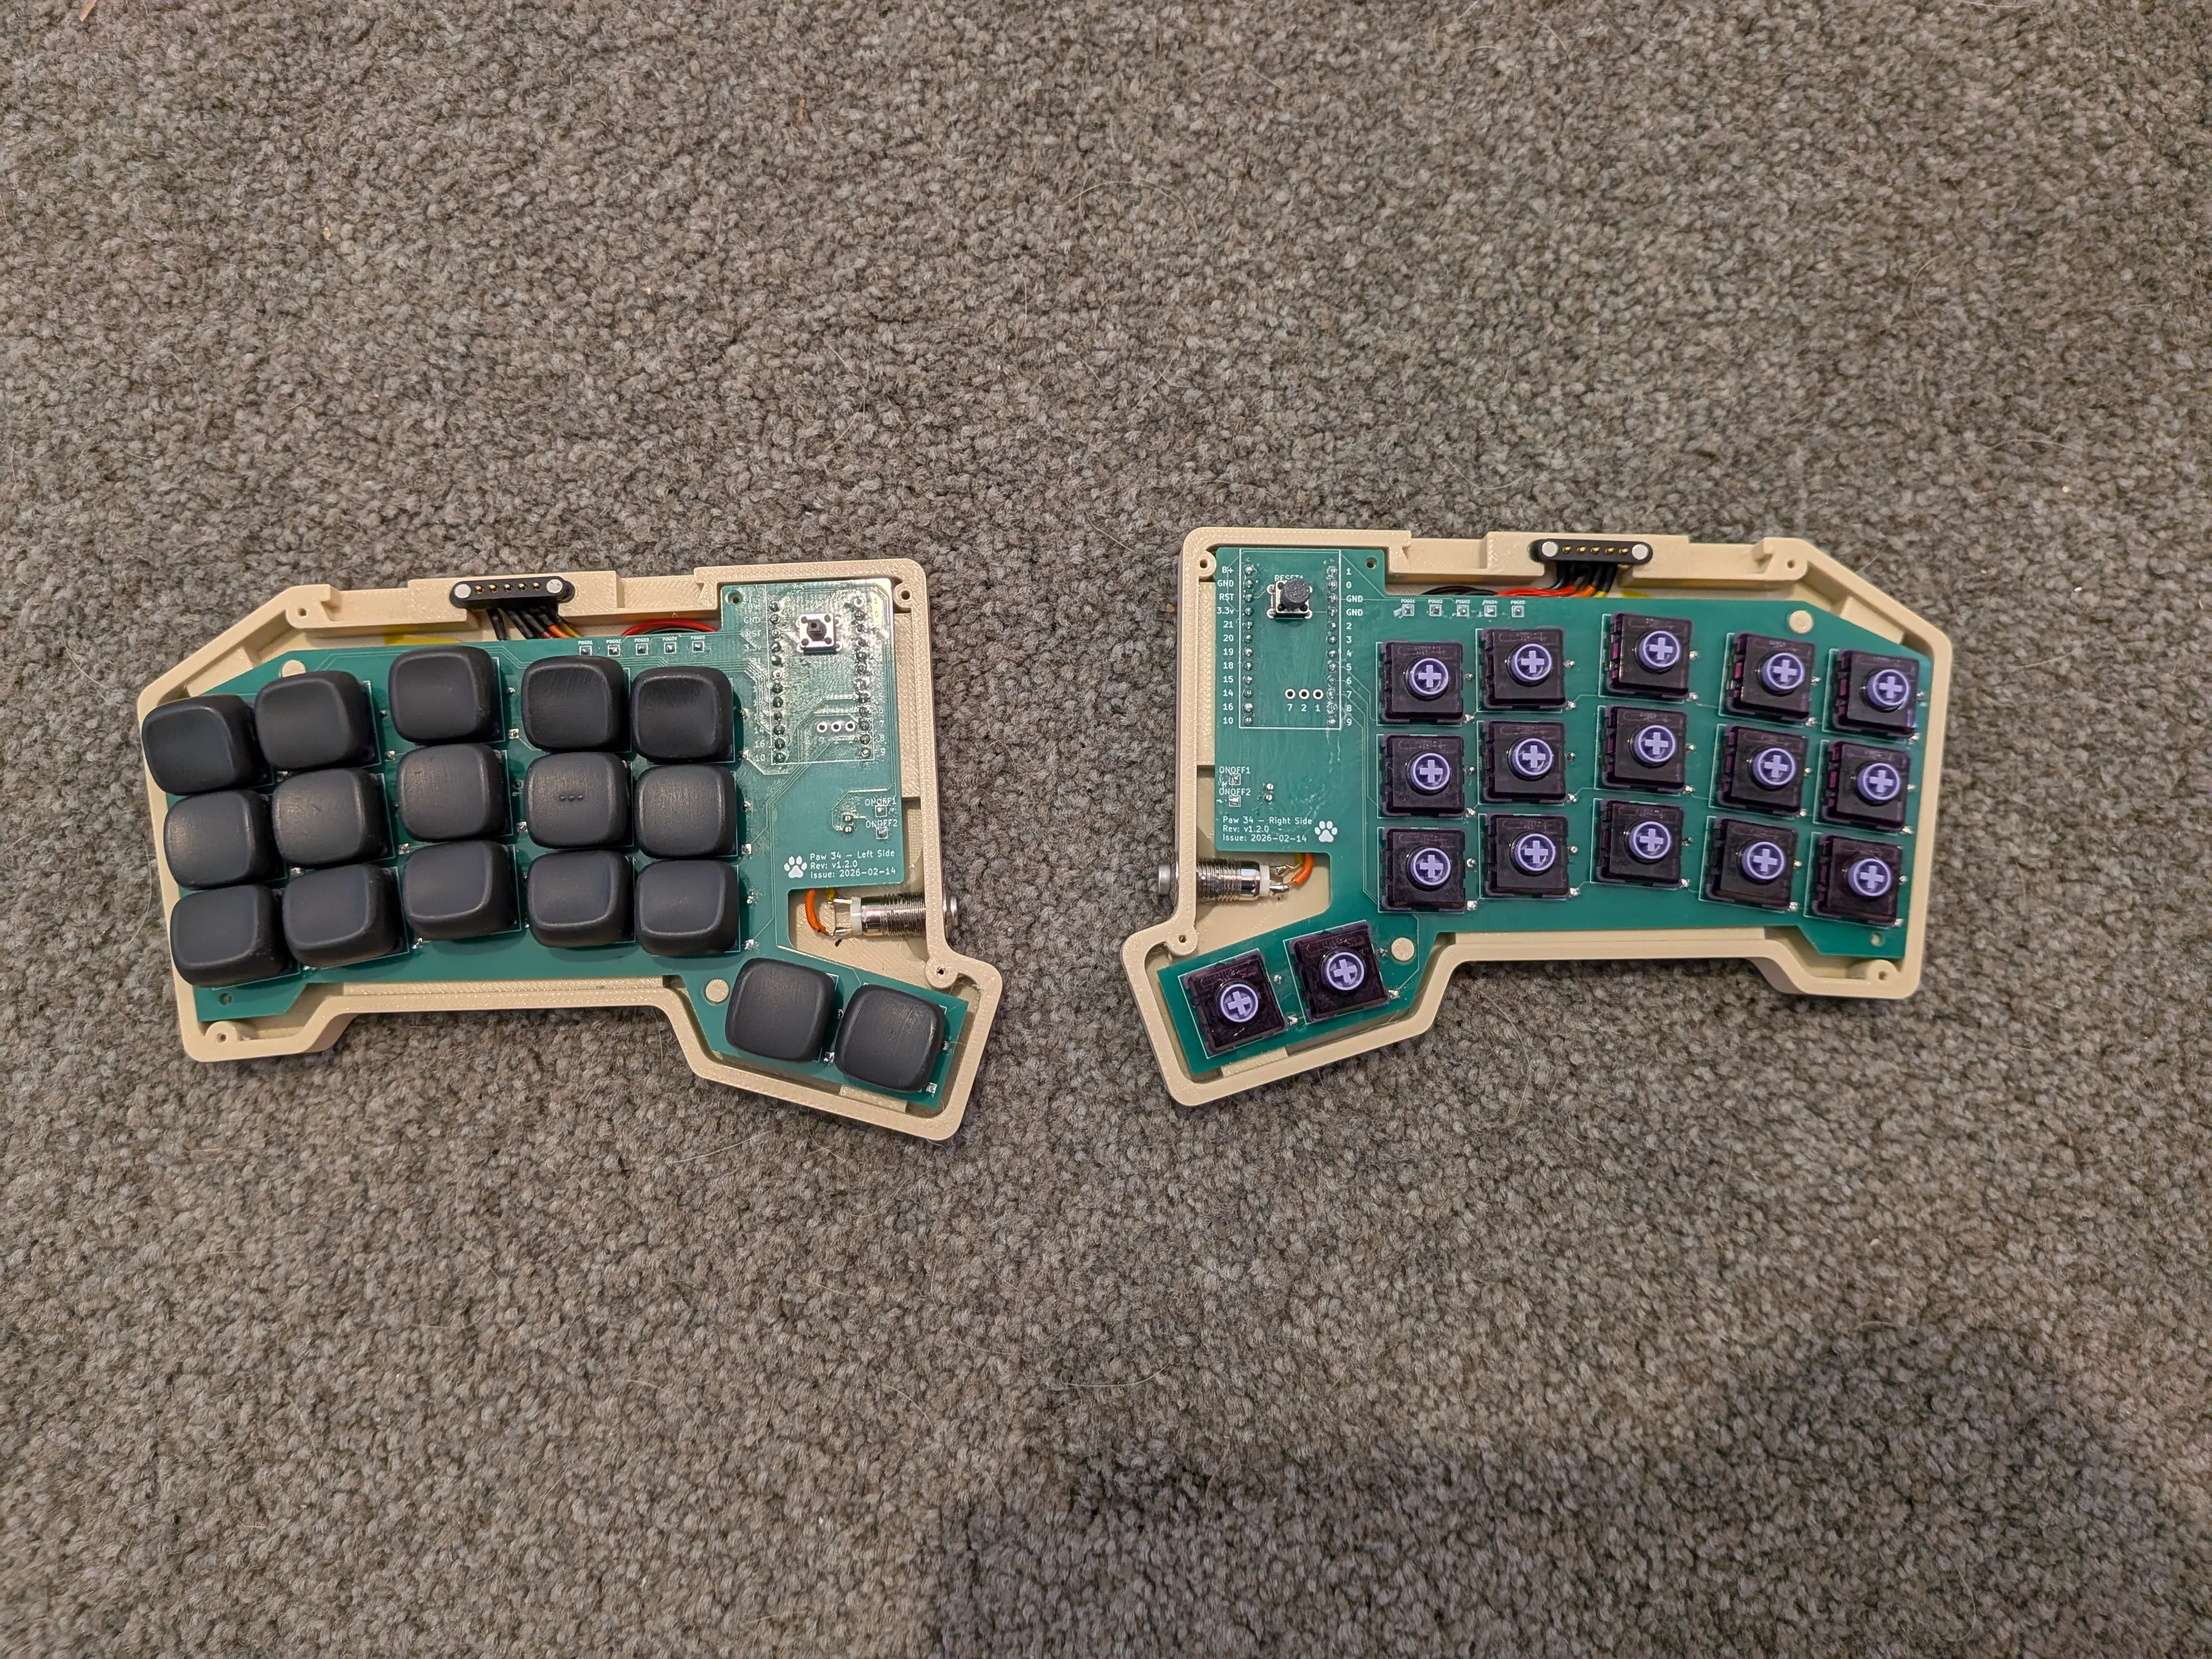
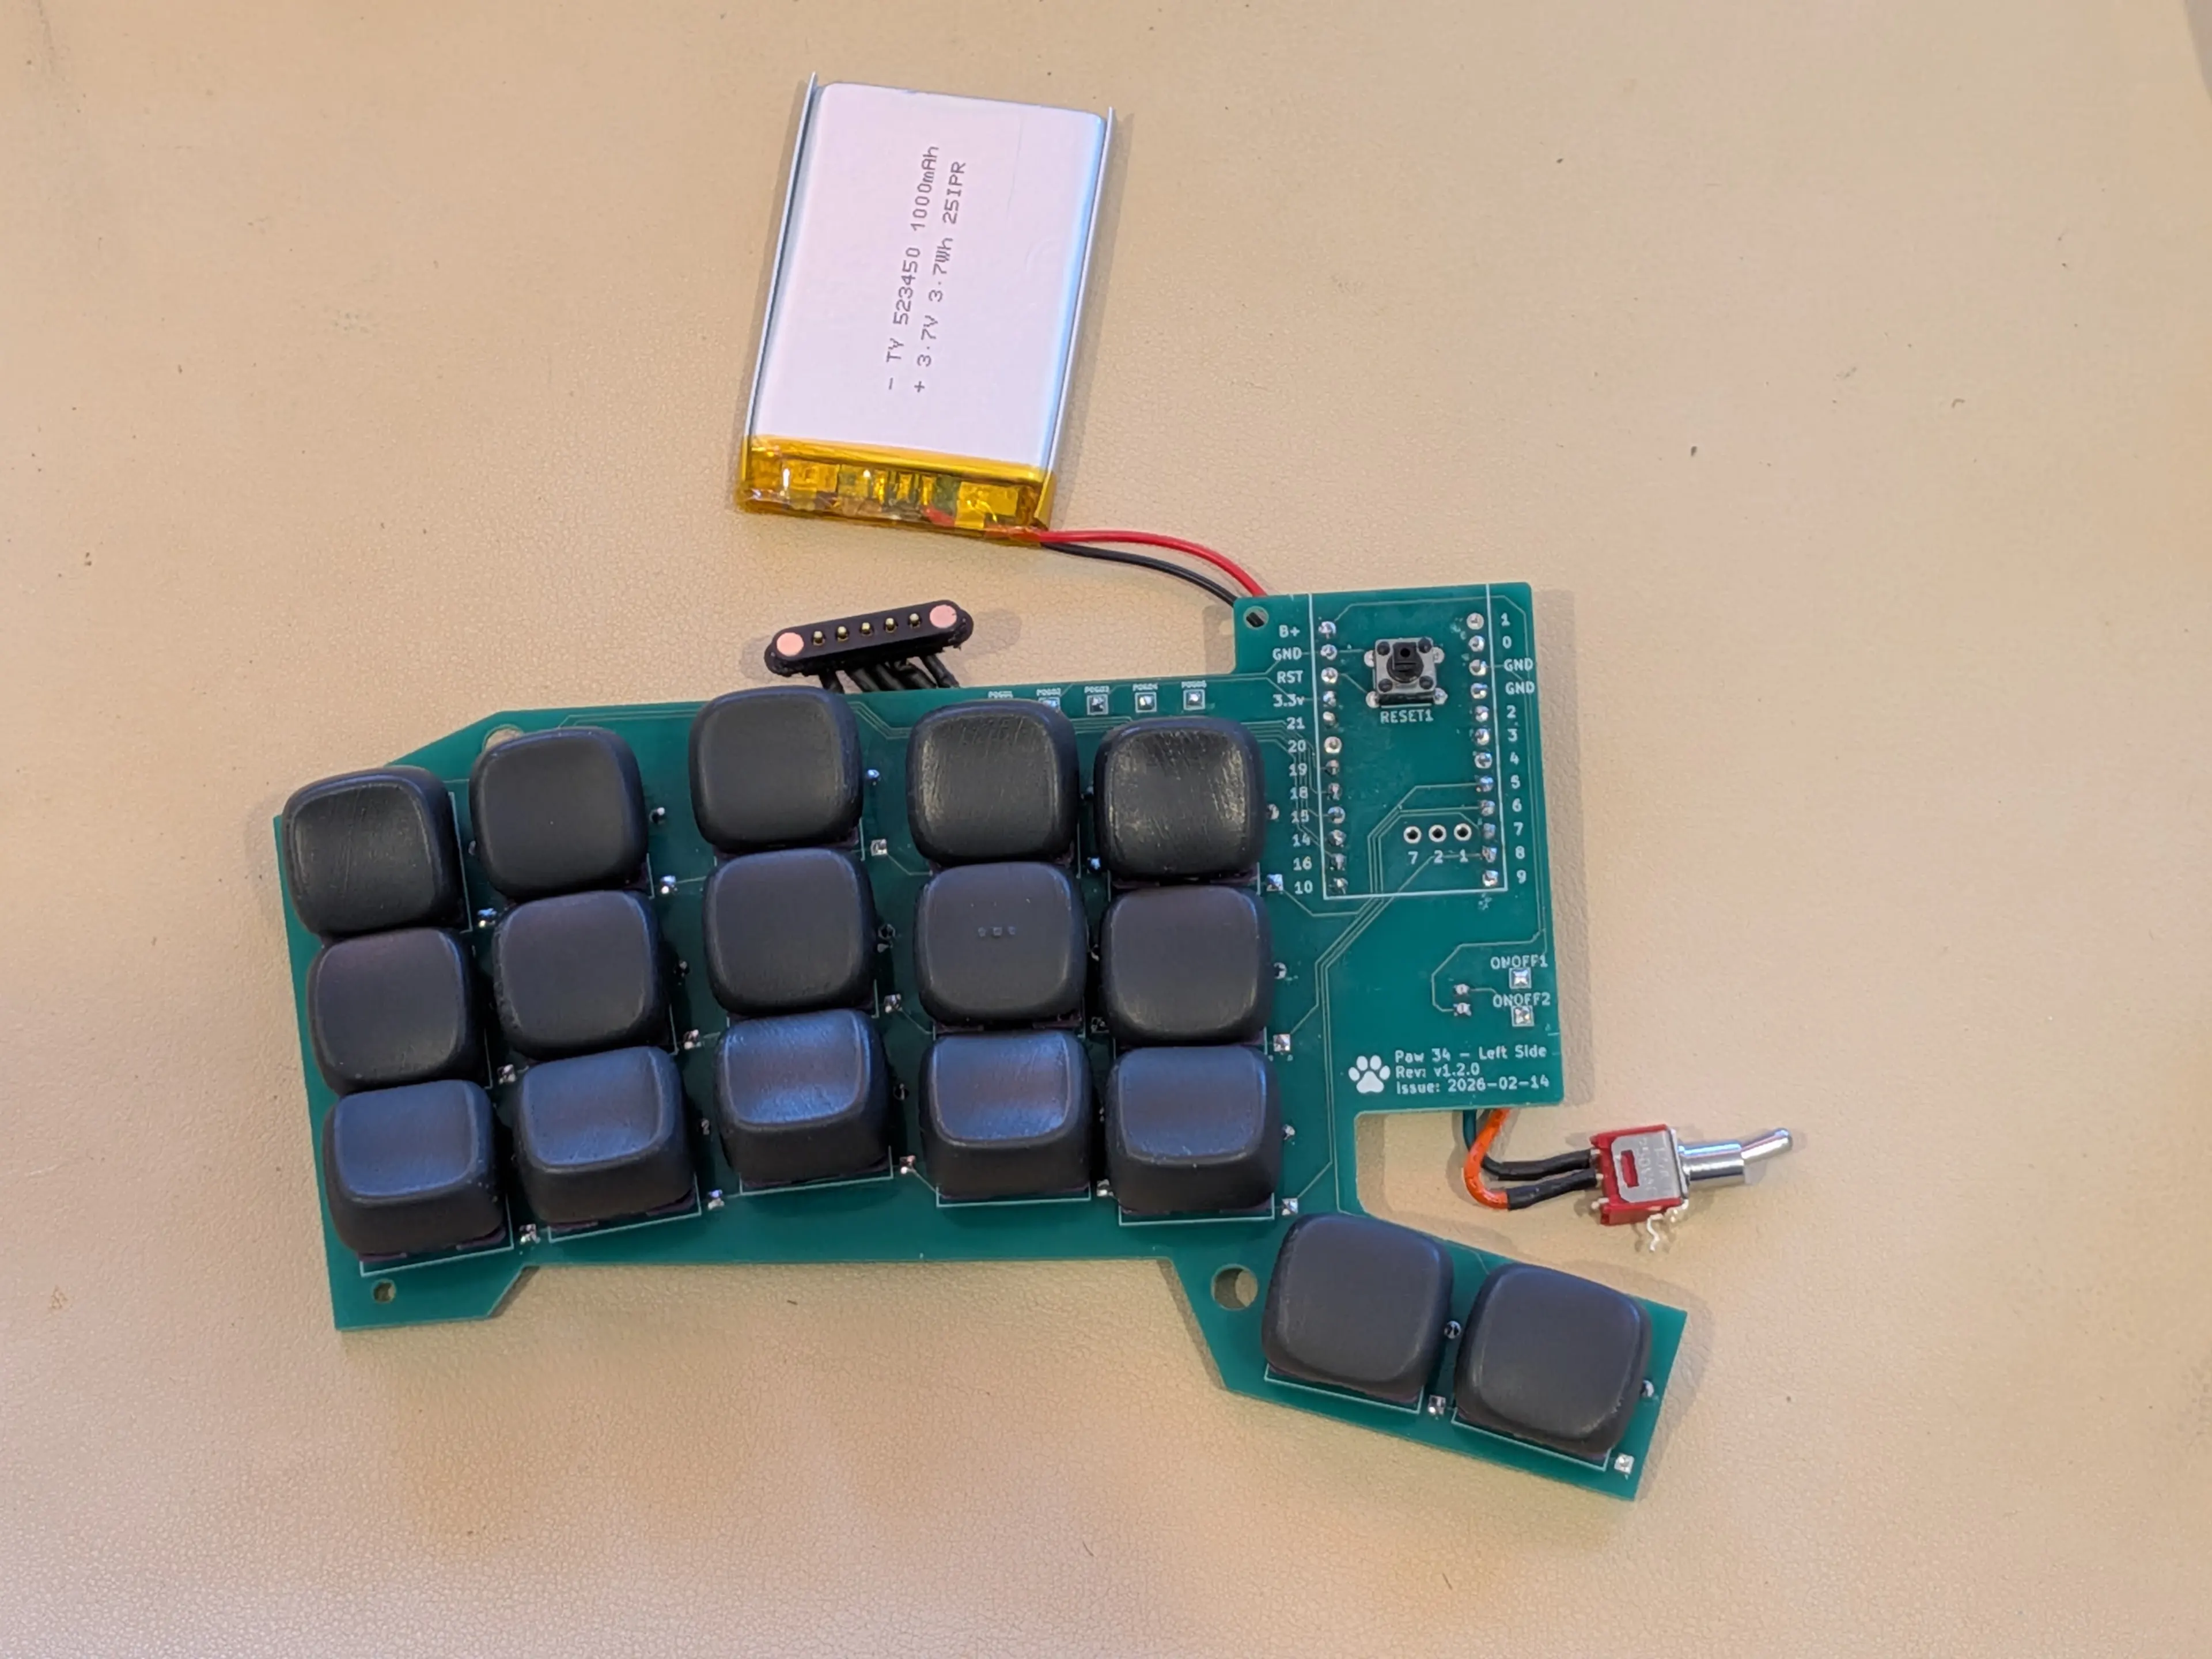
And when you strip away the case, this is what it all looks like naked, including the 1000mAh batteries:
Final thoughts and next steps
Overall I’m loving the typing experience. I’ve addressed the main source of discomfort I was experiencing on the Lobo and I think I’ve learned that there’s no substitute for typing in anger, to learn what you need from a keyboard.
I’ll probably build a dongle and remove the OLED from the central part of the keyboard I’m using currently. That might hopefully reduce power consumption (although with a 1000mAh battery that’s not a huge concern). Potentially I could play around with a trackball module for the keyboard but, realistically, I think I’m more of a trackpad guy… and the trackpad on this is actually big enough that it’s usable.
For the time being then, I might spend a while enjoying typing on the keyboard that I just built!